Overview
This guide walks you through how to import a list of leads when you only have street addresses (no city, state, or ZIP). Using a default location, the system can match those addresses to properties in the database and return available details.
When to Use This Method
Use this workflow when your list includes:
-
Street number + street name only
-
No city, state, or ZIP information
Step 1: Go to the Leads Section
-
From the left navigation menu, click Leads
-
At the top of the page, click Import File
Step 2: Upload Your File
You can upload:
-
CSV files
-
Excel files (.xls or .xlsx)
Important Notes:
-
Excel files will only import the first sheet
-
If your file has multiple sheets:
-
Combine them into one, or
-
Import them separately (ensuring the correct sheet is first)
-
-
Upload Options:
-
Drag and drop your file into the upload area
or -
Click to browse and select your file from your computer
File Preview:
-
Displays the first 3 rows
-
Shows your column headers
-
Scroll right if your file includes additional columns
Click Next once everything looks correct.
Step 3: Confirm Address Mapping
-
Ensure your Address column is correctly mapped
-
This field is required
-
-
If needed, use the dropdown to select the correct column from your file
Step 4: Set a Default Location
Since your file does not include city/state/ZIP, you’ll need to define a default location.
How to Do This:
-
Select Use One Default Location
-
Enter the location (e.g., Medina County, Ohio)
-
Select the correct option from the dropdown
Important:
-
This works best when all properties are in the same area
-
If your list includes multiple counties or cities:
-
Split your file into separate imports by location
-
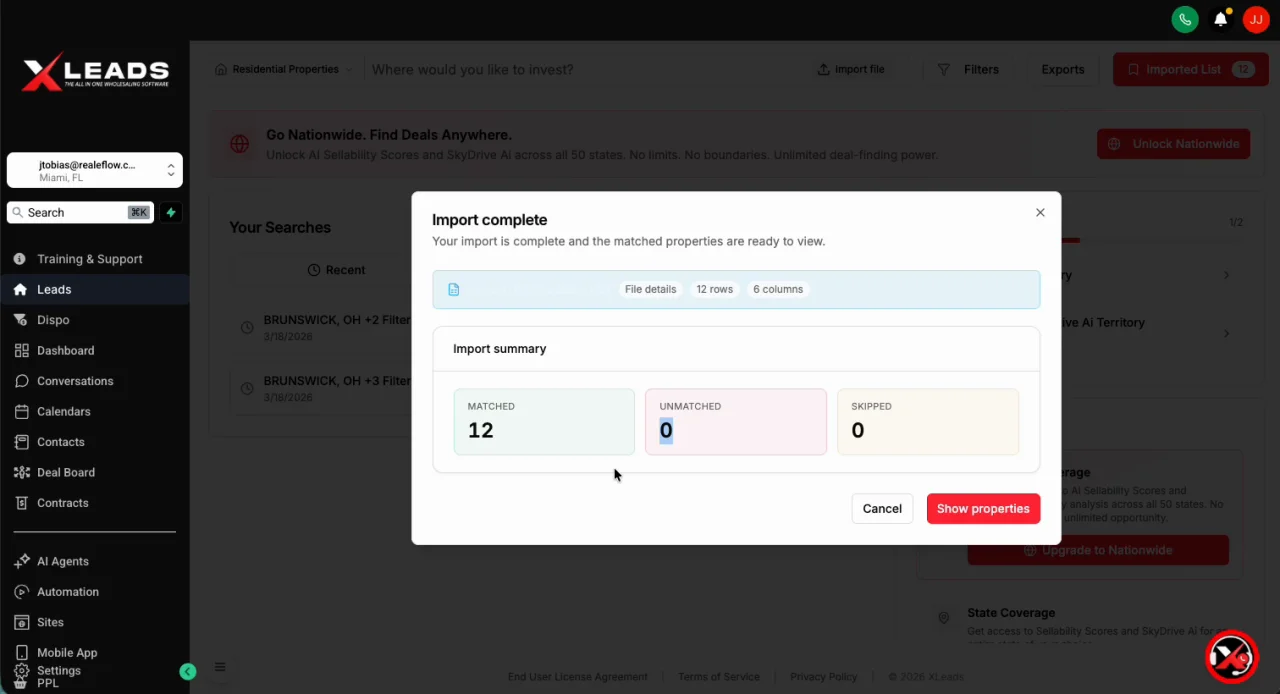
Step 5: Import Your List
-
Once the system shows “Ready to Import”, click Import
-
The system will process your file and display:
-
Number of matched properties
-
Any unmatched or skipped entries
-
Click Show Properties to view your results.
Step 6: Review Imported Properties
Your results will display in a familiar layout:
-
List view on the left
-
Map view on the right
Available Actions:
-
Click a property to view detailed information
-
Use the Filters button to refine your list
Step 7: Add Properties to a List
To take action on your leads, add them to a list.
Options to Add Properties:
-
Individually: Click the checkbox on each property
-
From Property Details: Click into a property and select Add to List
-
Bulk Select:
-
Click Select at the top
-
Choose Select Page or Select All
-
Visual Indicator:
-
A checkmark on a property means it has been added to the selected list
Managing Lists:
-
The active list is shown in the top right (e.g., “Imported List”)
-
To change the list or create a new list > Click the List name (top right) to open it.
-
This will allow you to select the Name of the list you would like to add the leads to.
OR -
Click Create New List to make a new one
-
Step 8: Take Action on Your Leads
Once properties are added to a list, you can:
Export Leads
-
Download your list as a spreadsheet
-
Choose which data fields to include (including lead-traced details)
Run SkyDrive AI Reports
-
Generate reports (if available on your plan)
Launch Direct Mail Campaigns
-
Send postcards directly through the platform
Step 9: Access Exported Files
-
Click the Exports button (above the map)
-
Download your saved files from the list
Best Practices
-
✅ Use this method only when your list lacks full address details
-
✅ Ensure all properties belong to the same location when using a default location
-
✅ Split lists into multiple imports if they span different regions
-
✅ Always confirm column mapping before importing
Josh Tobias
Comments