This article will walk you step-by-step through creating a Direct Mail campaign when your recipient list contains fewer than 2,500 contacts. You’ll learn how to select your lead list, configure campaign settings, choose a mailer, review and approve your proof, and complete checkout.
If your list exceeds 2,500 recipients, the setup process is slightly different, as campaigns are automatically distributed in weekly batches. This guide specifically covers the standard workflow for lists under 2,500 recipients. You can view the process if your list is greater than 2500 recipients HERE
How to Create a Direct Mail Campaign
Before You Begin
- You must have an existing Lead List created.
- If you have not yet filtered and saved a list, please complete the LEAD SEARCH process first.
Step 1: Access Your Lead List
- Navigate to Leads from the left navigation menu.
- This will open your Leads Dashboard.
- In the upper right corner, click the Lead List button
- Select the list you want to use.
- Confirm the selected list name appears at the top of the screen.
Tip: You can switch lists at any time before launching your campaign.
Step 2: Start a Direct Mail Campaign
- With your list selected, click Direct Mail.
- Enter a Campaign Name (for your internal reference).
- Choose how to handle Multi-Property Owners:
- Send one piece (recommended) – Sends one postcard per owner.
- Send per property – Sends one postcard for each property owned.
Note: Direct mail is sent to the property owner, which may be different from the property address.
You will see an estimated campaign total (based on a 4x6 postcard).
4. Click Continue.
- You will be directed to the Direct Mail Dashboard. It may take a few minutes for the campaign to load. Once it is ready, the campaign will appear in the Direct Mail Dashboard as a Draft & will be clickable.
- Please Note: If you do not see the update after a few minutes, refresh the page by clicking the circular arrow in your browser’s address bar. This will return you to the Leads Dashboard. From there, click the Menu (three horizontal lines) in the bottom-left corner of the screen to open the menu window. Select Direct Mail to navigate to the Direct Mail Dashboard.
Once on the Direct Mail Dashboard, your campaign should appear as a Draft and will be clickable.
“Draft” means recipients have been added, but setup is not complete. The Newest campaign will be at the top.
Step 3: Campaign Draft Creation
Click on the Campaign Name To begin the setup wizard
Step 4: Complete the Setup Wizard
The wizard walks you through each required step.
Configure your Campaign
- View Campaign Name
- Campaign Summary
Click Next to continue (bottom right hand corner)
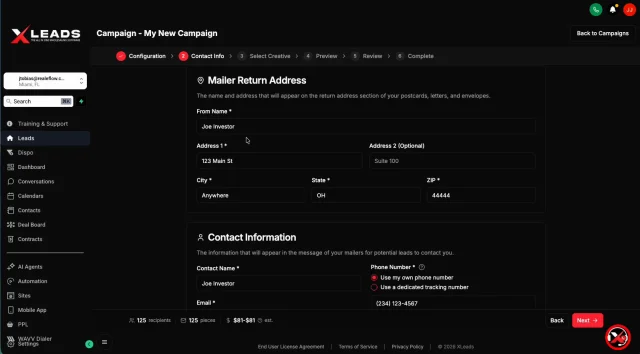
Enter Mailer Return Address
- Enter your return address details.
- Required fields are marked with an asterisk (*).
- Click Next when complete.
- You can save this information under Settings to auto-fill future campaigns.
Enter Contact Information
- Enter the Contact details that will display on the mailers
- Choose one of the following:
- Use your own phone number
- Use a Tracking Number
Tracking Numbers (Optional)
- Cost: $19.99 per year
- Calls forward to your chosen phone number
- Ideal if you prefer not to display your personal number
Seed Mail
- Seed mail is a quality control feature that sends you a copy of each mailer. This allows you to verify the design and content before your leads receive them.
You will be charged the standard per-piece rate for each mailer sent to yourself.
To Include yourself in the campaign, click the box to the left of 'Mail a copy to myself'
Click Next to continue.
Select Your Mailer
- Choose a postcard design.
- Hover over a design and click the preview (eye icon) to see the front and back.
- Select your desired template (a checkmark will appear).
- Click Next.
Preview & Approve Proof (Required)
- Click Preview Proof.
- Review:
- Contact information
- Return address
- Mailer layout
Click Approve. - You must approve the proof before proceeding.
- Please Note : When previewing, the 'Recipient Details will be fictitious name and address. However, your contact details & return mailer address will be what was entered when creating the campaign and what will be on the mailers sent.
Click Next after approval.
Step 5: Review, Accept Terms & Checkout
- Review your campaign details.
- Agree to the Direct Mail Terms & Conditions
- You will do this by clicking on the box to the left of 'I agree to the Direct Mail Terms and Conditions' - Click 'CHECKOUT'
- Enter or select your payment method.
- Click Pay to launch the campaign.
- Mailers are typically delivered within approximately one week after payment is processed.
Managing Your Direct Mail Campaigns
You can access the Direct Mail Dashboard at any time:
- Click the menu icon in the bottom-left corner.
- Select Direct Mail.
Campaigns Tab
- View Draft campaigns
- View Active campaigns
- Resume incomplete setups
Tracking Numbers Tab
- Purchase new tracking numbers
- Manage forwarding numbers
Settings Tab
Save default information for future campaigns:
- Return address
- Contact details
Benefits:
- Prevent typos
- Save time during setup
- Automatically populate required fields
You can also view:
- Cost per piece
- Volume-based discounts
Key Reminders
- Campaigns remain saved as Drafts until payment is completed.
- Proof approval is required before checkout.
- Tracking numbers are optional but recommended for marketing privacy.
- Delivery typically occurs within one week of campaign launch
Josh Tobias
Comments