Lead Tracing allows you to acquire phone numbers and email addresses for the properties in your list. This article walks through how to:
-
Create and save a filtered list
-
Add properties to your list
-
Export the list with Lead Trace contact information
-
Download your completed file
To Lead Trace your list:
-
Filter your properties
-
Create and save a list
-
Add properties (individually or all at once)
-
Export using Standard Format
-
Select Lead Trace
-
Download your file from the Exports section
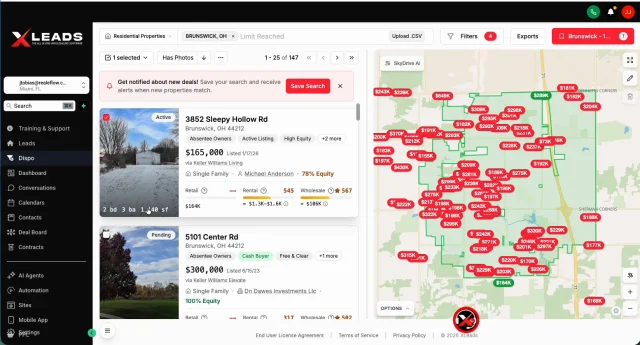
Step 1: Complete Your Property Search
-
Click Leads in the left navigation menu.
-
Enter your location at the top of the screen.
-
Click the Filters button and apply your desired criteria.
-
You can use the filter tabs at the top or scroll down to view all filter options.
-
-
Once applied, your results will display (example: 147 matching properties).
At this point, you’re ready to add these properties to a list.
Step 2: Create a New List
Before lead tracing, properties must be saved to a list.
-
Click the LIST button in the upper-right corner.
-
If no list exists, it may say My List.
-
If lists already exist, it will show the most recent list used.
-
-
Select Create New List.
-
Enter:
-
List Name (Example: Brunswick 10-Year Owner – 65% Equity)
-
Optional Description
-
Optional Tags (Up to 20 tags allowed)
-
-
Click Create List.
You’ll notice the list is created but currently shows 0 leads selected.
Step 3: Add Properties to Your List
You can add properties individually or in bulk.
Option A: Add Individually
-
Click on a property address to open the details screen.
-
Select Add To (upper right hand corner) and choose your newly created list.
-
Once added:
-
The property will highlight in green.
-
A checkmark will appear confirming selection.
-
You can also:
-
Use the checkbox on the property card to quickly add it to the active list.
Option B: Add All Properties at Once
-
Click the Selected button (top of the results area).
-
Choose:
-
Select Page (current page only), or
-
Select All (entire filtered list)
-
-
Click Select All to add all properties (example: 147 leads).
Your list now contains all selected properties.
Step 4: Export with Lead Trace Data
Once your properties are added, you’re ready to export.
-
Click the Selected button again.
-
Choose Export.
Please Note: First-time users will need to accept a one-time data acknowledgment before exporting.
Choose the Correct Export Format
You will see two export options:
-
Standard Format (Required for Lead Trace data)
-
Facebook Custom Audience (Does not include full lead trace details)
Select Standard Format.
Select Data Fields
The following options will be available:
-
Overview (included by default)
-
Basic Details (Owner name, address, beds, baths)
-
Lead Trace (Select this to include phone numbers and email addresses)
You may also:
-
Add additional property details
-
Include custom tags
At the bottom of the window, you’ll see:
-
Monthly usage totals
-
MLS usage information
Click Export.
You will see a message that your file is being prepared.
Step 5: Download Your Export
To access your exported file:
-
Click the Exports button (available anywhere in the Leads section).
-
Locate your most recent export.
-
Click Download.
The file will download as a ZIP file.
-
Open the ZIP file on your computer.
-
Open the exported spreadsheet.
-
Scroll to the right to view all included contact details (phone numbers and email addresses).
Additional Notes
-
Properties marked with a checkmark indicate they’ve been added to your active list.
-
If a phone number appears on the Do Not Call (DNC) list, an additional click may be required to view it.
-
The chat icon on the screen can be moved if it blocks the export button.
Josh Tobias
Comments